


")
")
")
")


?")


We live in a digital age where distractions are just a click away, making website blocking crucial for boosting productivity and enhancing security. Did you know that employees spend an average of 3 hours per day on non-work-related websites, costing businesses billions annually? Moreover, with cyber threats on the rise, restricting access to certain sites can help safeguard sensitive information and prevent malware attacks.
So, if you’re looking to stay focused and safeguard your digital well-being, you’re in the right place. In this blog, we’ll walk you through the process of blocking websites on Google Chrome, one step at a time. Whether you’re aiming to minimize distractions during work hours or protect yourself from potentially harmful sites, these simple instructions will help you take control of your online experience, right from your search engine.
With cyber threats on the rise and the need for improved productivity more important than ever, implementing website blocking measures can make a significant difference. So, let’s dive in and learn how to use Google Chrome to create a safer and more productive browsing environment.
Using Chrome Extensions to Block Websites on Chrome
Chrome extensions offer powerful tools for enhancing your browsing experience, including the ability to block websites with ease. In today’s digital age, where distractions are aplenty, harnessing the power of these extensions can be a game-changer. Let’s explore how you can leverage Chrome extensions to take control of your online habits and boost productivity.
Installing Chrome Extensions:
- Navigate to the Chrome Web Store: Open Google Chrome and visit the Chrome Web Store by typing “chrome://extensions” into the address bar or clicking on the three dots in the top-right corner and selecting “Extensions” from the menu.
- Search for the Extension: Use the search bar to find popular website-blocking extensions like “Block Site” or “StayFocusd.”
- Install the Extension: Click on the extension you want to install, then click “Add to Chrome” and confirm the installation by clicking “Add extension.”
Using “Block Site” Extension:
- Access Extension Settings: After installation, click on the extension icon in the Chrome toolbar and select “Options” to access the settings.
- Add Websites to Block List: In the settings menu, navigate to the “Block Sites” tab and enter the URLs of the websites you want to block.
- Customize Blocking Options: Customize blocking options such as setting specific times for blocking, enabling password protection, or redirecting to a motivational page.
Using “StayFocusd” Extension:
- Set Daily Time Limits: Access the extension settings and specify the amount of time you want to allow for browsing distracting websites each day.
- Add Websites to Blocked List: Enter the URLs of websites you want to block under the “Blocked Sites” tab.
- Enable Nuclear Option: Activate the “Nuclear Option” feature to block all distracting websites for a set period, providing an extra layer of self-control.
Tips for Customization:
- Experiment with Different Settings: Explore the features offered by each extension and adjust settings according to your preferences and browsing habits.
- Stay Consistent: Consistently enforce website blocking rules to form positive habits and maintain productivity levels.
- Regularly Review Blocked Sites: Periodically review your list of blocked websites to ensure it aligns with your current goals and priorities.
By following these steps and implementing website-blocking extensions, you can create a more focused and productive browsing environment, helping you make the most of your time online.
Chrome Settings for Website Blocking:
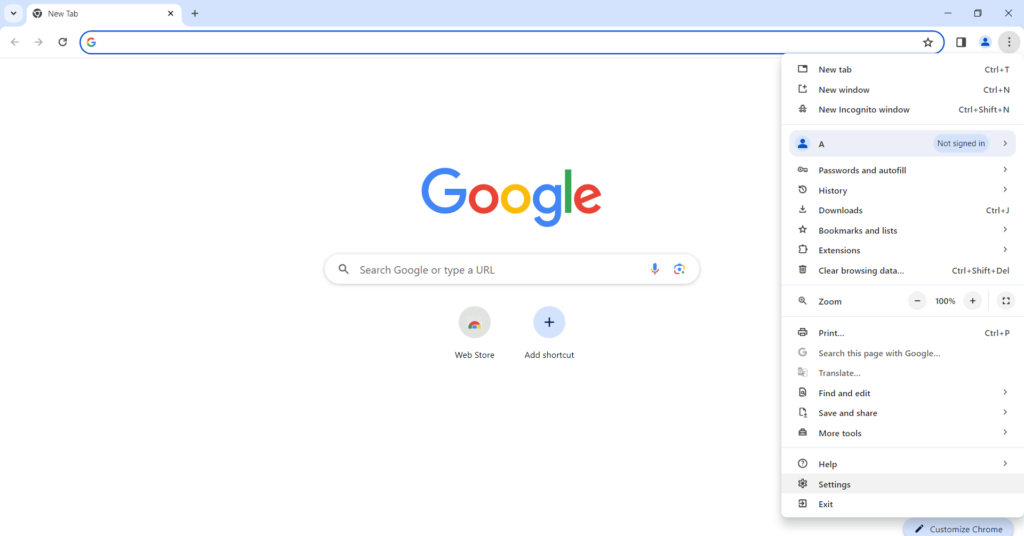
1. Access Chrome Settings: Open Google Chrome and click on the three dots in the top-right corner of the browser window. From the dropdown menu, select “Settings.”
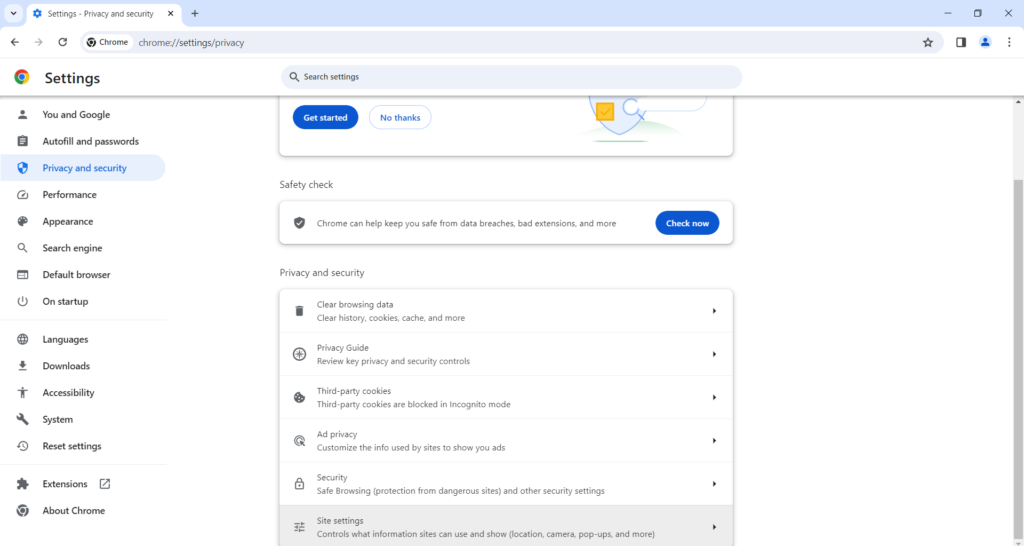
2. Navigate to Site Settings: In the Settings menu, scroll down and click on “Privacy and security” in the left sidebar. Then, click on “Site settings.”
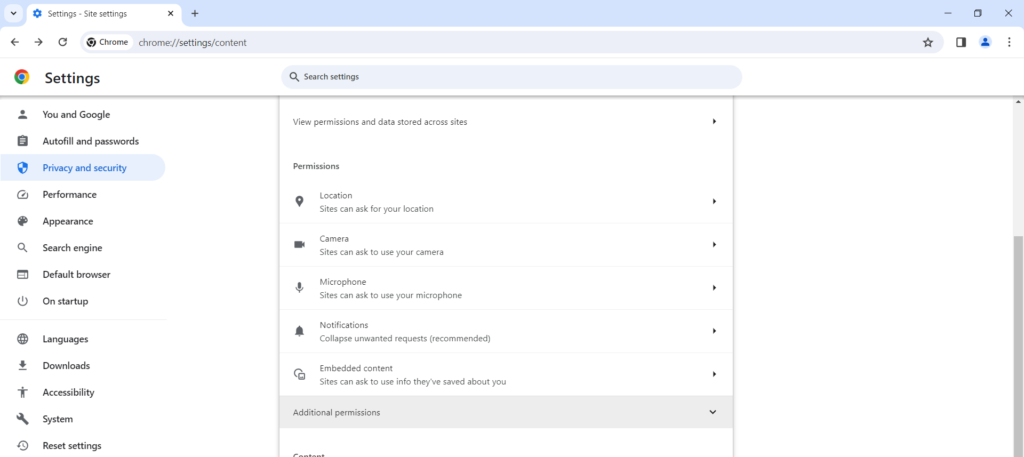
3. Manage Blocked Sites: Under the “Permissions” section of Site Settings, click on “Additional permissions.” Then, select “Block” next to the “Sites that can never use cookies” option.
4. Block Specific Sites: To block specific websites, scroll down to the “Blocked” section and click on “Add” next to “Block.” Enter the URL of the website you want to block and click “Add.”
5. Manage Blocked Sites: To view or manage the list of blocked websites, scroll down to the “Block” section. Here, you can remove or edit blocked sites as needed.
6. Utilize Managed Blocked Sites: Chrome also offers a feature called “Managed Blocked Sites,” which allows administrators to block websites for all users on a network. This feature is typically used in enterprise or educational environments.
7. Customize Permissions: Chrome’s Site Settings also allow you to customize permissions for individual websites, such as allowing or blocking notifications, accessing camera and microphone, and more.
By utilizing Chrome’s built-in settings, you can effectively block websites and customize permissions to enhance your browsing experience and improve productivity.
Parental Controls to Block Websites on Chrome
Google Chrome offers robust parental control features to help parents manage their child’s online activities and ensure a safe browsing experience. With Chrome’s supervised accounts, parents can set up restrictions and block access to inappropriate websites easily.
To set up supervised accounts, parents need to create a Google Account for their child and designate it as a supervised account. Once set up, parents can access the Family Link app to manage site restrictions and block specific websites. In the app, parents can customize settings based on their child’s age, browsing habits, and parental preferences.
Here are some tips for parents to customize controls effectively:
- Set age-appropriate filters: Adjust filtering settings to block websites with mature content or inappropriate material based on your child’s age.
- Review browsing history: Regularly check your child’s browsing history to monitor their online activities and ensure compliance with set restrictions.
- Block specific websites: Use the blocklist feature to manually add websites that you want to block, such as social media platforms or gaming sites.
- Set time limits: Implement time restrictions to limit your child’s screen time and encourage healthy digital habits.
- Communicate openly: Have open discussions with your child about internet safety and responsible online behavior to reinforce the importance of parental controls.
By following these tips and utilizing Chrome’s parental control features, parents can create a safe and secure online environment for their children to explore the internet.
Using Hosts File to Block Websites
The Hosts file is a powerful tool for blocking websites at the system level, effectively preventing access to specific web addresses. Here’s how you can utilize the Hosts file to block unwanted websites on different operating systems:
- Locating the Hosts File:
- Windows: Navigate to
C:\Windows\System32\drivers\etc\hosts. Open the file using a text editor like Notepad. - macOS: Access the Hosts file at
/etc/hosts. Use a text editor like TextEdit to modify the file. - Linux: The Hosts file is located at
/etc/hosts. You can edit it using a text editor like Nano or Vim.
- Windows: Navigate to
- Editing the Hosts File:
- Add a new line at the end of the file for each website you want to block.
- Enter the IP address
127.0.0.1followed by the domain name of the website you wish to block. - For example:
127.0.0.1 example.com.
- Cautionary Notes:
- Be careful when editing the Hosts file to avoid syntax errors.
- Always back up the original Hosts file before making any changes.
- Ensure you have administrative privileges to modify the Hosts file on your system.
- Testing and Verification:
- Save the changes to the Hosts file and restart your web browser.
- Try accessing the blocked website to confirm that it is now inaccessible.
Using the Hosts file to block websites provides a system-wide solution that applies to all web browsers and applications on your computer. However, it’s essential to use this method responsibly and exercise caution when modifying system files.
Router Settings for Website Blocking
Blocking websites at the router level allows you to enforce restrictions across your entire network, providing a comprehensive solution for managing internet access. Here’s a step-by-step guide to configuring website blocking through router settings:
- Accessing Router Settings:
- Open a web browser on a device connected to your home network.
- Enter your router’s IP address in the browser’s address bar. Common router IP addresses include
192.168.1.1or192.168.0.1. - Log in to your router’s administration panel using the default username and password or the credentials provided by your internet service provider.
- Configuring Website Blocking:
- Navigate to the “Parental Controls” or “Access Restrictions” section of your router settings.
- Locate the option to block specific websites or set up URL filtering.
- Enter the URLs of the websites you want to block in the designated fields.
- Save your settings and apply the changes to enforce website blocking on your network.
- Router-Specific Tips:
- Router settings and menu options may vary depending on the manufacturer and model.
- Refer to your router’s user manual or online documentation for detailed instructions specific to your device.
- Some routers offer advanced features such as scheduling access restrictions or setting up custom filtering rules. Explore these options for additional control over website blocking.
Configuring website blocking at the router level provides a centralized approach to managing internet access for all devices connected to your network. By implementing these settings, you can ensure a safer and more productive online environment for your household or organization.
Third-Party Software for Website Blocking on Chrome:
When it comes to blocking websites on Chrome, third-party software offers additional features and flexibility beyond built-in browser settings. Here’s an overview of popular third-party software options and how to use them effectively:
- Cold Turkey:
- Cold Turkey is a powerful website blocking tool that allows users to create customized blocklists and schedules.
- To install Cold Turkey, visit the official website and download the application.
- After installation, launch Cold Turkey and navigate to the settings to configure your blocklist and schedule.
- Once set up, Cold Turkey will prevent access to blocked websites according to your specified settings.
- Net Nanny:
- Net Nanny is a comprehensive parental control software that includes website blocking features.
- Begin by purchasing and downloading Net Nanny from the official website.
- Follow the installation instructions and create a Net Nanny account to access the dashboard.
- From the dashboard, you can set up website blocking rules and customize filtering options based on content categories and individual websites.
- Comparison of Features and Pricing:
- Compare features such as website blocking, scheduling, and reporting across different software options.
- Consider pricing plans and subscription models to find the best fit for your budget and requirements.
- Look for additional features like application blocking, time tracking, and usage reports for comprehensive internet management.
Using third-party software like Cold Turkey and Net Nanny provides advanced website blocking capabilities tailored to your specific needs. Whether you’re looking to increase productivity or enhance online safety, these tools offer effective solutions for managing internet access on Chrome.
Chrome Mobile Website Blocking
Blocking websites on the Chrome mobile app is essential for maintaining productivity and focus on-the-go. Here’s how to do it:
- Utilizing Mobile Browser Settings:
- Open the Chrome app on your mobile device and tap the three dots in the top-right corner to access the menu.
- Navigate to “Settings” and select “Site settings” or “Privacy and security.”
- Tap on “Block cookies” or “Block sites from running JavaScript” to restrict access to certain websites.
- You can also enable “Safe Browsing” to protect against harmful sites and downloads.
- Third-Party Apps for Website Blocking:
- Explore third-party apps available on the Google Play Store or Apple App Store, such as “BlockSite” or “Focus: Website Blocker.”
- Download and install the preferred app on your mobile device.
- Follow the app’s instructions to set up website blocking and customize your block list.
- Syncing Block Lists:
- Ensure that you’re signed in to your Google account on both your desktop and mobile devices.
- Some third-party apps may offer syncing capabilities across devices, allowing you to manage block lists seamlessly.
- Alternatively, manually update your block list on each device to ensure consistency.
By utilizing mobile browser settings or third-party apps, you can effectively block websites on the Chrome mobile app and maintain productivity wherever you go. Don’t forget to sync your block lists for a consistent browsing experience across all your devices.
Wrap Up
blocking websites on Google Chrome is a crucial step in enhancing productivity, security, and focus while browsing the web. By following the step-by-step instructions outlined in this guide, you can effectively block unwanted websites using various methods such as Chrome extensions, browser settings, parental controls, and more. Whether you’re a parent looking to protect your child’s online activity, an individual aiming to minimize distractions, or an organization seeking to enforce web usage policies, implementing website blocking measures can greatly benefit you. Remember to choose the method that best suits your needs and preferences, and don’t hesitate to explore additional resources and tools for further customization. With the right approach, you can take control of your browsing experience and create a safer, more productive online environment.
FAQs (Frequently Asked Questions):
- Can I block websites on Chrome without installing additional extensions or software?
- Yes, you can block websites using built-in Chrome settings such as “Site Settings” and “Managed Blocked Sites”. These settings allow you to manually add websites to a block list and customize browsing restrictions without the need for extensions or software.
- Will blocking websites affect my browsing experience on other browsers or devices?
- Blocking websites on Chrome typically applies only to the Chrome browser on the device where the settings are configured. However, some methods like router-level blocking may affect all devices connected to the same network. Be sure to review the specific settings and limitations of each method to understand their impact.
- Is it possible to bypass website blocking measures?
- While website blocking measures can effectively restrict access to certain websites, determined users may find ways to bypass these restrictions using various methods such as VPNs or proxy servers. It’s important to regularly review and update your blocking settings to stay ahead of potential workarounds and ensure continued effectiveness.


")